
I've recently received a request to do a DIY change oil. My car is not yet due for one but fortunately, my friend Push's car is! Being an avid DIYer himself, he dropped by and allowed me to help him do his oil change.

Meet Bugoy, Push's car - a Toyota Corolla that looks like any other car from the outside...

...but packs quite a punch from the inside - a 4A-GE - silvertop engine. :-D
The pre-requisite of changing your engine's oil every 5,000 kms (3,000 miles) is a subject of much debate. Most manufacturers/service centers will strongly recommend this while there are some which claim that this is a hoax (a marketing gimick for service centers and oil companies to make more money) For me, I change my car's oil every 6 months (if budget permits and if I use my car a lot) or at least once a year. I've been doing this ever since I started maintaining our car. A change oil will cost you less than a thousand pesos if done in your own garage as compared to around 1500 when done by "professionals". :)

For this oil change, Push bought a Caltex Havoline 20W-40 oil and a VIC oil filter. TIP: Be sure to use the right type of oil/filter for your car (there are options to consider - oil for gas/diesel engines, SAE rating, mineral, semi synth, fully synthetic, etc.). I've used VIC filters since they are made from Japan and I feel that it gets the job done. Robinson's Handyman sells VIC oil filters and they have a catalog that lists down a manufacturer's engine and the corresponding VIC filter for it.

The first step is to drain the old oil out. Most manuals suggest that the engine should be warmed up first before draining the oil since it makes the oil flow out more freely. It also suspends all the gunk and sludge in the oil and flows out together with it. REMINDER: Just warm up the oil - after all, you're going to go underneath the car and handle all that used oil later on. You don't want to burn yourself. All engines have a drain plug underneath, it is located at the oil pan (bottom of the engine). It is a bolt that looks out of place since it is in the bottom of your engine and doesn't hold anything in place. See the picture above for Bugoy's drain plug.

Carefully untighten the bolt. Since Bugoy's ground clearance is low, we had to jack him up. Unfortunately, we don't have jack stands (this is next on our To Buy list) so we had to be careful in removing the bolt - jerking a car on jacks too much could squish anyone underneath it.

Make sure that an oil pan is ready before the drain plug is removed - things will get messy if you're not prepared :) TIP: An old oil container is perfect for the job :)

Oil will flow out once the bolt is removed. Make sure used oil is disposed off properly. Dumping it in the sewers is a No - No. Most gasoline stations will accept used oil for disposal. I tend to keep some for myself as I use it in lubricating our gate's hinges :)


We opted to flush out the engine with some compressed air. This is not a must but since we had it around, we used it. See that we have an air/water separator to make sure we're not pumping in moisture inside the engine.
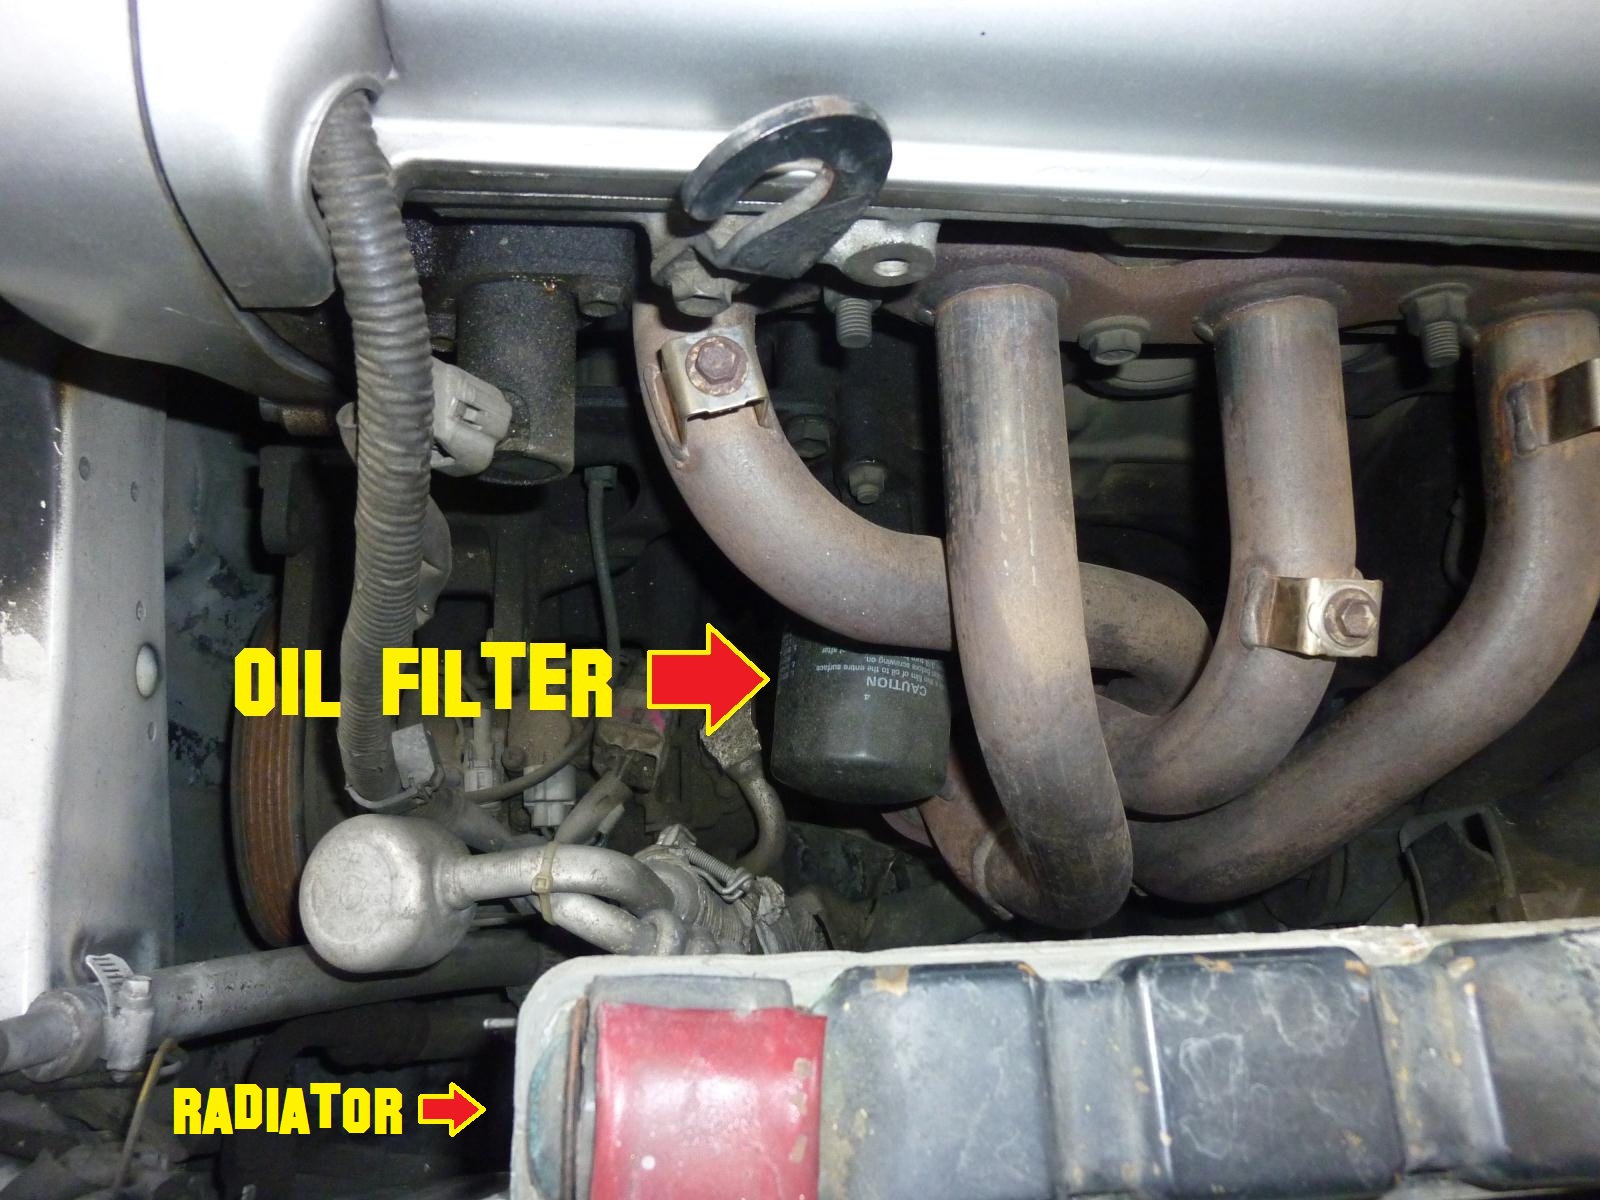
While waiting for the oil to drain, we removed the oil filter. This engine's oil filter is located right under the headers - this is the same with my lancer's engine (4g93 DOHC). Most engines will have a heat shield that covers the headers. You could either remove it or slide underneath the car and squeeze your way to removing them.

The proper way of removing an oil filter is by using an oil filter wrench but if you don't have one - you could remove it with the use of a coarse grit sandpaper. Just wrap it around the filter and unscrew it by hand :)

Wrap the chain around the oil filter and loosen it.

Once it is loose, removing it by hand is easy.

It is must to replace your oil filter every time you change your oil.

Before placing the new one in, spread a bit of fresh oil on the filter's lip (rubber gasket). This protects the gasket when you're screwing it back in place.

Hand tighten the new filter into place - no need to use the wrench here as it could over tighten the filter and strip out its threads/seals.

After placing back the drain plug (be careful not to over tighten it - stripping the bolt's threads here would be a big problem!), the engine's ready for the fresh oil! The car's manual states how much oil the engine needs. Most cars (sedans) need only 4 liters of oil. To avoid spills, use a funnel to pour oil in. If you don't have a funnel, an old cardboard will do :). Don't overfill.

It is good practice to fill it with 3 liters of oil first and then check the dipstick. F for full and L for low - the dipstick will sometimes indicate an overfill but it will drop once you start up the engine and allow the oil to circulate to the new oil filter.
Check the filter and drain plug for leaks and you're done!
YES! YOU CAN CHANGE YOUR CAR's OIL AT HOME! :)
: It looks so easy to do but I prefer to hire a mechanic to change oil on my Toyota Corolla. I think it would be more convenient and safer for me.
ReplyDeleteHi Kyoko, it is easy but I understand where you're coming from. If you're not confident in tinkering around with things - it's always better to hire someone else to do it for you. But you could always try doing it just once for the heck of it and if you can't complete it, then you could get someone to finish it for you hehe just my two cents about that. Thanks for reading my post - appreciate it!
DeleteWell describe information dear. Thanks for sharing it Rubber Wheels & Polyurethane Wheels
ReplyDeleteThe oil filters have a very important job in the engine of a car or truck. It acts as the barrier that purifies oil as it runs through the engine and lubricates all of the fast moving parts. Thanks for this guide it's helpful.
ReplyDelete